
VINYL INSTALLATION 1
Hang it Straight and Aligned
Step 1: fold back a small section of the backing on one of the sides (in this case I did the top). This way you can stick the vinyl to the wall, but still be able to remove it and move it around as needed.

Step 2: Use a level to put against a straight line to make sure it is level. If the vinyl is off a bit, put your level down, hold down one of the ends with your finger, peel the rest off the wall and slightly turn it (whichever way you need to go), attach it to the wall again and check it with the level. Repeat as many times as necessary to get it level.
When attaching make sure you follow my dry application instructions and leave it attached, lift up, peel the backing away, and apply rest of vinyl to the wall in a steady swipe of your hand.
*HINT* If you are hanging a saying or design and have no distinct straight line to follow, make one yourself. Use a ruler and mark with a pencil a straight line on top of the masking. Find some part of the design or saying that is a straight line. If using a saying, follow the bottom of one of the lines (see below). Now you have a guide to go off of. You can also make one going vertically as well to follow.

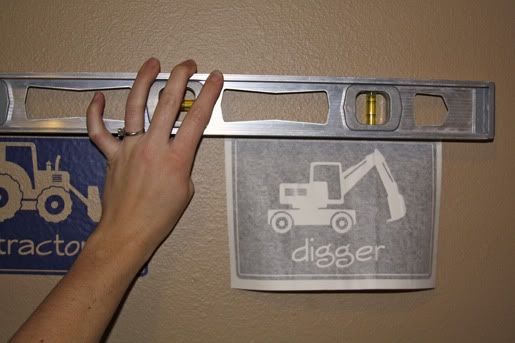
Step 3: Now what can get really tricky is when you need to attach multiple items that need to be not only level, but level with each other. After attaching your first piece, you will do the same step process with the next pieces on the same horizontal plane.
When checking to see if the second is matching up with the first. You will partially attach it (step 1), and place your level on top of the top straight line of each piece. If it will remain touching and level with both pieces, it is ready to attach.
*ALSO* You may also draw a line on your wall with a pencil to follow. You will simply put your level where you want it, make sure it is level and then draw a line following the top of the level. Now you will only need to line your vinyl top up with the line on the wall.

Step 4: Attach the vinyl by keeping the top attached, peeling the backing away and sticking the vinyl down to the wall with a steady swipe of the hand.

Step 5: If you are attaching your next piece on top and want the sides lined up instead of the tops. You will follow make a line straight up from the bottom one with your level like listed in the end of Step 3. You will line up your vinyl (this time my backing is peeled slightly away on the side of the vinyl so that it will stick to the wall. Make sure it is level and as high/low as you would like it.
Step 6: Attach the vinyl by keeping the top attached, peeling the backing away and sticking the vinyl down to the wall with a steady swipe of the hand.

With this particular design shown you will need to do this with 6 different pieces, but depending on your design, you might get to do it a few less :)
Hopefully this helps give you a few ideas on how to make your vinyl straight next time you will be installing it.


No comments:
Post a Comment